How To Insert A Checkbox In Excel: A Comprehensive Guide For Users
Excel is a powerful tool that allows users to manage data efficiently, and one of the most useful features is the ability to insert checkboxes. Whether you're creating a to-do list, tracking progress, or building complex forms, checkboxes can streamline your workflow and improve productivity. In this article, we will explore how to insert a checkbox in Excel, step by step, along with advanced tips and tricks.
Many users may find themselves wondering how to add checkboxes in Excel, especially if they're unfamiliar with the program's advanced features. Thankfully, Excel provides multiple methods to insert checkboxes, whether you're using Windows, macOS, or even Excel Online. This guide will walk you through each method, ensuring you have the knowledge to implement checkboxes effectively.
By mastering this feature, you'll not only enhance your Excel skills but also make your spreadsheets more interactive and user-friendly. Let's dive into the details and learn how to insert a checkbox in Excel effortlessly.
- Greene Criticizes Bidens Border Screenings A Comprehensive Analysis
- Bill Maher Challenges Jasmine Crocketts Leadership An Indepth Analysis
- Republican Exits After Misgendering A Comprehensive Analysis Of The Incident
- Tony Finaus Surprising Divorce Comment Unveiling The Truth Behind The Controversy
- Rams Bold Move Kupp Vs Adams A Gamechanging Decision
Table of Contents
- Introduction to Excel Checkboxes
- Methods to Insert a Checkbox in Excel
- Inserting Checkboxes in Excel for Windows
- How to Add Checkboxes in Excel for Mac
- Using Checkboxes in Excel Online
- Customizing and Formatting Checkboxes
- Using Checkboxes with Excel Functions
- Best Practices for Using Checkboxes
- Troubleshooting Common Issues
- Conclusion and Next Steps
Introduction to Excel Checkboxes
Checkboxes in Excel are a versatile tool that allows users to mark items as complete or incomplete. They are particularly useful for creating interactive forms, tracking progress, or organizing data in a structured manner. By learning how to insert a checkbox in Excel, you can significantly enhance the functionality of your spreadsheets.
Excel checkboxes are part of the form controls and can be added using the Developer tab or through other methods, depending on your version of Excel. Whether you're working on a personal project or a professional task, understanding how to use checkboxes can make your work more efficient.
Methods to Insert a Checkbox in Excel
There are several ways to insert a checkbox in Excel, depending on the platform you're using. Below, we'll explore the most common methods:
- Patriots Land Pro Bowl Wr Deal Revolutionizing The Nfl Offensive Strategy
- Trumps Federal Layoff Deadline Looms A Comprehensive Analysis
- Federal Layoffs Tarlovs Tense Clash
- Maher Doubts Democratic Future Exploring The Challenges And Uncertainty
- Thunders Jalen Williams Leaves Game A Comprehensive Analysis
- Using the Developer Tab
- Inserting Checkboxes via the Insert Menu
- Adding Checkboxes in Excel Online
Each method has its own advantages, and we'll cover them in detail in the following sections.
Inserting Checkboxes in Excel for Windows
Enabling the Developer Tab
Before you can insert a checkbox in Excel for Windows, you need to ensure that the Developer tab is visible in your ribbon. To enable it, follow these steps:
- Click on "File" in the top-left corner of Excel.
- Select "Options" from the dropdown menu.
- In the Excel Options window, choose "Customize Ribbon" on the left-hand side.
- Check the box next to "Developer" in the right-hand panel.
- Click "OK" to save your changes.
Once the Developer tab is enabled, you can proceed to insert checkboxes.
Adding a Checkbox Using the Developer Tab
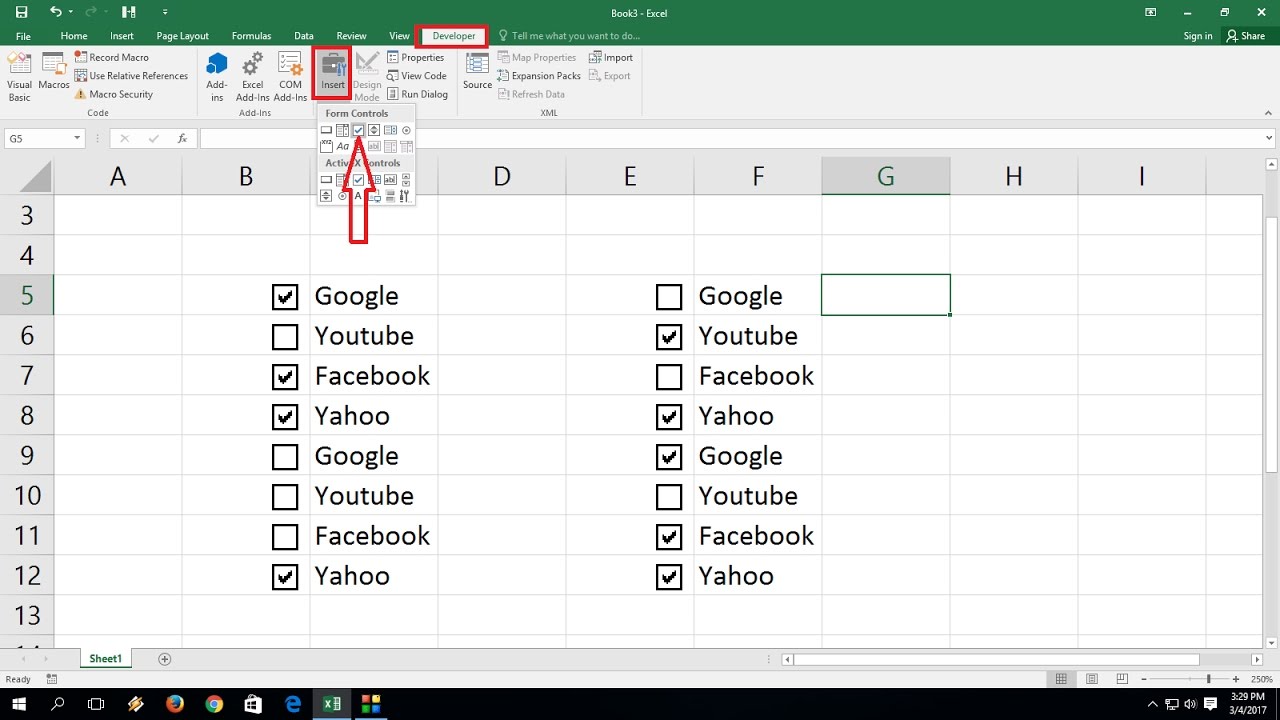
With the Developer tab enabled, follow these steps to insert a checkbox:
- Go to the Developer tab in the ribbon.
- Click on "Insert" in the Controls group.
- Select "Check Box" from the Form Controls section.
- Click and drag on your worksheet to create the checkbox.
You can now label the checkbox and link it to a specific cell for better functionality.
How to Add Checkboxes in Excel for Mac
Adding checkboxes in Excel for Mac follows a similar process to the Windows version. However, there are slight differences in the interface. Here's how you can do it:
- Open Excel and navigate to the "Tools" menu.
- Select "Forms" from the dropdown list.
- Choose "Check Box" from the available options.
- Click and drag on your worksheet to place the checkbox.
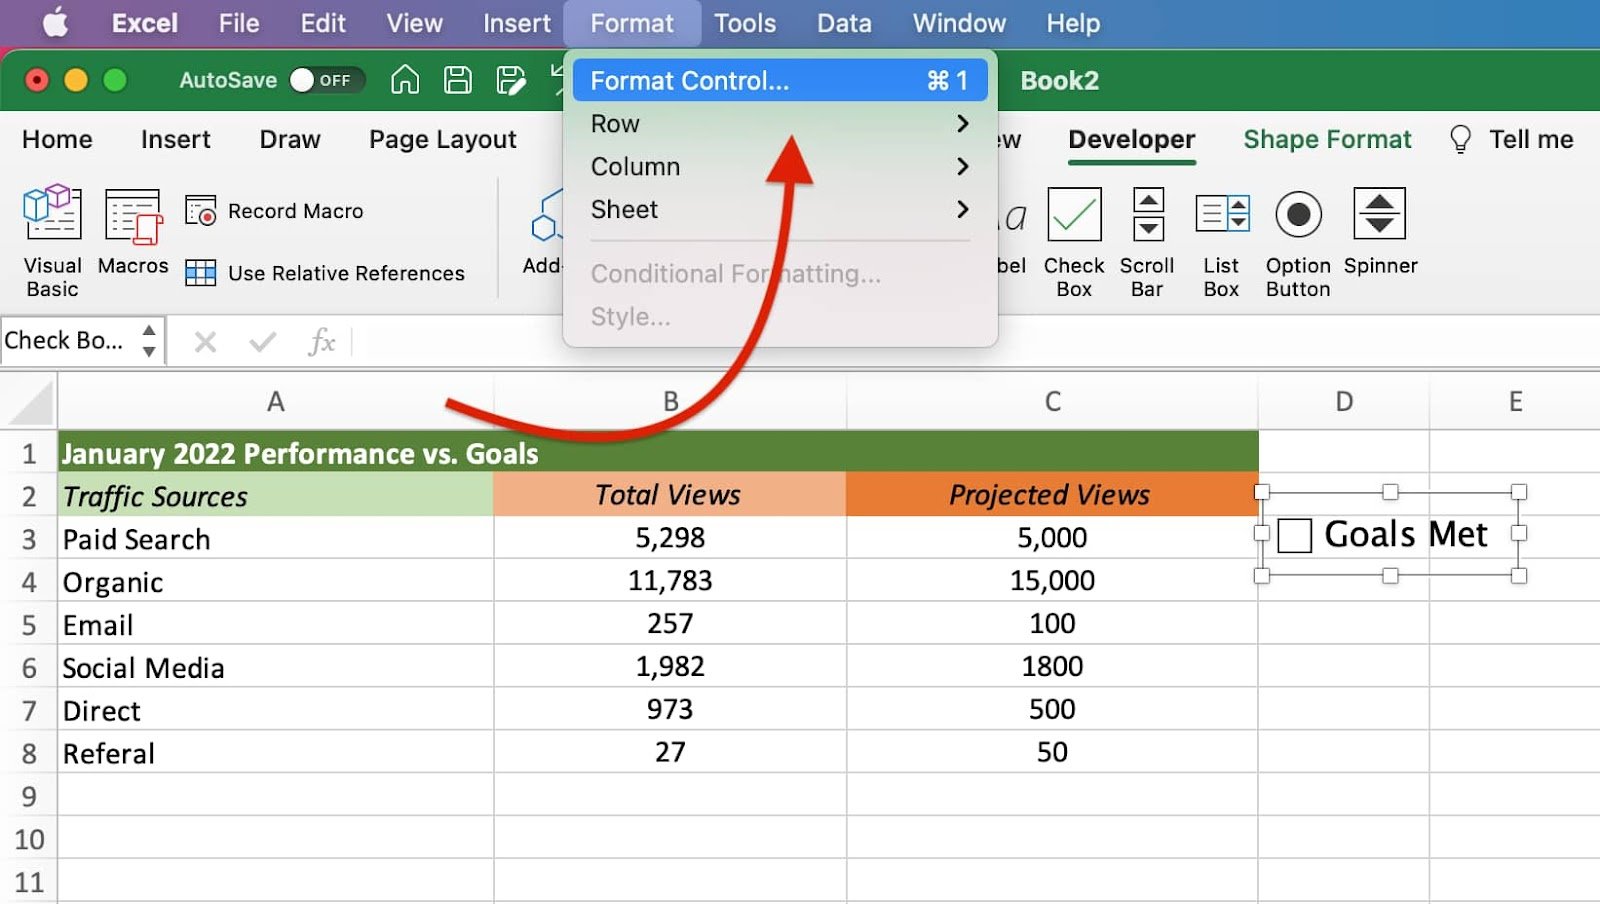
Mac users can also customize the appearance and functionality of checkboxes using the Format Control dialog box.
Using Checkboxes in Excel Online
Limitations of Excel Online
While Excel Online offers many features, it has some limitations compared to the desktop version. One of these limitations is the inability to add form controls like checkboxes directly. However, there is a workaround:
- Use Excel's built-in checkbox feature by typing "Yes" or "No" in a cell and formatting it as a dropdown list.
- Alternatively, use Excel's "Data Validation" feature to simulate checkboxes.
Although not as robust as the desktop version, these methods can still be effective for simple tasks.
Customizing and Formatting Checkboxes
Once you've inserted a checkbox in Excel, you can customize its appearance and behavior to suit your needs. Here are some tips for formatting checkboxes:
- Change the size and position: Drag the edges of the checkbox to resize it or click and drag to move it to a new location.
- Add a label: Right-click the checkbox and select "Edit Text" to add a descriptive label.
- Link to a cell: Right-click the checkbox and choose "Format Control." In the Cell Link field, enter the reference of the cell you want to link.
Customizing checkboxes ensures they integrate seamlessly into your spreadsheet and provide the desired functionality.
Using Checkboxes with Excel Functions
Linking Checkboxes to Formulas
One of the most powerful features of Excel checkboxes is their ability to interact with formulas. For example, you can use a checkbox to control the visibility of certain data or trigger calculations. Here's how:
- Link the checkbox to a specific cell as described earlier.
- Use an IF statement to check the value of the linked cell. For example:
=IF(A1=TRUE, "Complete", "Incomplete"). - Apply the formula to other cells or ranges as needed.
By combining checkboxes with Excel functions, you can create dynamic and interactive spreadsheets that respond to user input.
Best Practices for Using Checkboxes
To get the most out of checkboxes in Excel, follow these best practices:
- Use consistent labeling: Ensure all checkboxes have clear and concise labels to avoid confusion.
- Limit checkbox usage: Avoid cluttering your spreadsheet with too many checkboxes. Use them only where necessary.
- Test functionality: Always test your checkboxes to ensure they work as expected and are linked correctly.
Following these guidelines will help you create professional and efficient spreadsheets that make the most of Excel's checkbox feature.
Troubleshooting Common Issues
Even with a thorough understanding of how to insert a checkbox in Excel, users may encounter issues. Below are some common problems and their solutions:
- Checkbox not visible: Ensure the Developer tab is enabled and the checkbox is properly placed on the worksheet.
- Checkbox not functioning: Verify that the checkbox is linked to a cell and that the cell reference is correct.
- Formatting issues: Check the formatting settings to ensure the checkbox is not hidden or overlapping with other elements.
If you continue to experience issues, consult Excel's official documentation or online forums for additional support.
Conclusion and Next Steps
In this comprehensive guide, we've explored how to insert a checkbox in Excel using various methods, including the Developer tab, Excel Online, and more. We've also discussed customization options, best practices, and troubleshooting tips to help you master this feature.
By incorporating checkboxes into your Excel spreadsheets, you can create more interactive and efficient documents that enhance your workflow. To further improve your Excel skills, consider exploring other advanced features such as macros, pivot tables, and conditional formatting.
We encourage you to share this article with others who may benefit from it and leave a comment below with your thoughts or questions. For more Excel tips and tricks, explore our other articles on the site.
- Joey Bosas Big Team Choice A Turning Point In Nfl History
- Mark Kelly Responds To Musks Accusation A Comprehensive Analysis
- Trump Trade War Hits Retirement Accounts The Impact On Your Financial Future
- Gigi Hadids Paris Fashion Week Look A Comprehensive Style Guide
- Cowboys Fans Anticipate Kupp Trade Announcement
:max_bytes(150000):strip_icc()/ExcelCheckBox3-8bb0f46a30a04d1eaa6aebde7cfb37c2.jpg)
Checkbox In Excel How To Insert Checkbox In Excel Create Chart Hot
How To Insert A Checkbox In Excel The Best Porn Website
How to Insert a Checkbox in Excel in 4 Easy Steps Creative Data Networks

